Open topic with table of contents
Edit Building Information
Use the Edit Building Information dialog to enter or edit information about the building, including sections.
To edit building information:
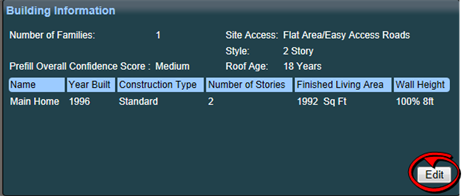
- In the Building Information panel, click the Edit button.
-
The Edit Building Information dialog appears.
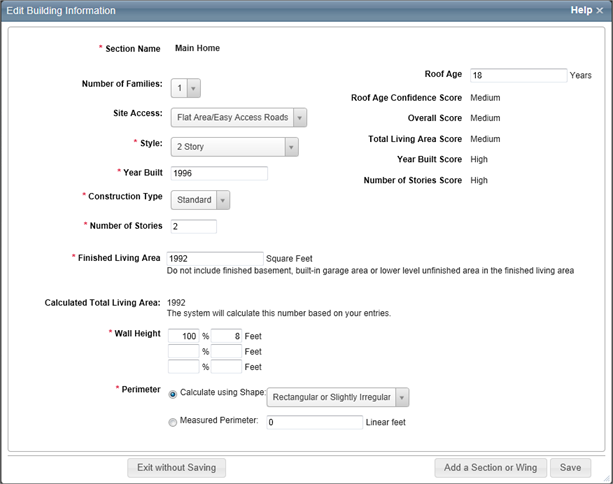
- Enter the building information in the appropriate fields. Required fields are indicated with an asterisk. Certain fields include the Interactive Help feature.
When you enter information in the Edit Building Information dialog, RCT provides an interactive help feature for certain fields. Interactive help automatically enters pertinent information into the building information dialog after you make a selection from the help topic.
Important: If you select the help topics from other locations within the help system this feature is not available. It only appears when you select help from the fields in the Edit Building Information dialog.
Interactive help works with the Site Access, Style, Construction Type, and Perimeter fields.
To use interactive help with the Style field:
- On the Edit Building Information dialog, click Style to display the help topic that shows all the available home styles.
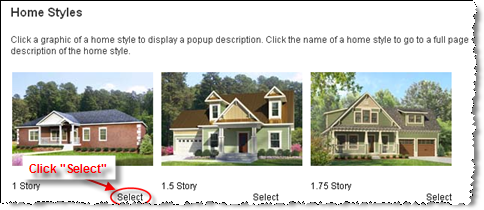
- Underneath each home style graphic is a "Select" link. Pick the home style you want and click Select. All pertinent information for that style is automatically entered into RCT.
To use interactive help with the Site Access, Construction Type, or Perimeter fields:
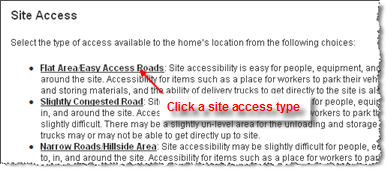
- On the Edit Building Information dialog, click the field name, for example "Site Access" to display the help topic.
- Click the underlined name of the definition you want to use (for Perimeter, click a graphic). The pertinent information is automatically entered into RCT.
Interactive Examples:
Site Access: Click the type of site access and all the relevant information is automatically entered into RCT.
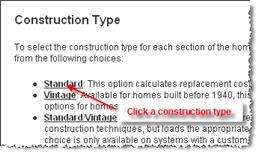
Construction Type: Click the construction type and all the relevant information is automatically entered into RCT.
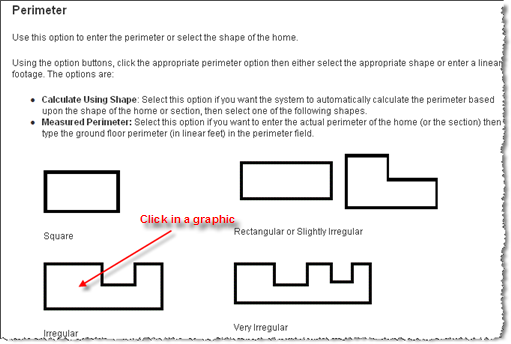
Perimeter: Click the graphic of the perimeter shape of the home and the information is automatically entered into RCT.
- If you need to add a section click Add a Section or Wing at the bottom of the dialog.
- Click Save to save and update the information. If any errors exist they will be displayed after clicking Save.
Definitions for building information fields:
 Advanced Entry
The advanced entry method is especially designed to be used by field estimating and inspection professionals assigned to evaluate truly unique mansion-grade homes. Advanced entry enables field professionals to estimate even the most complex floor plans and designs including vertical or horizontal sections, multiple level basements, garages with finished living area, servant’s quarters, and guest houses. Additional features include:
- Section-specific material selection entry for highly detailed estimates
- Superstructure adjustments necessary for accurate high value structural costs
- Efficient material selection
- Extensive roof style, shape, and pitch adjustments
- Wings/sections can be defined as coverage A or B
- Garage-specific wall, foundation, and material finishes
- Basement adjustments including multiple story basements, depth, material and finishes, walkout, and exposed wall options
- Location-specific data and calculations for site access, foundations, and materials
To use advanced entry select the Advanced Entry check box on the Dashboard, Main.
 Section Name
For the main home this defaults to "Main Home" and is not editable. If you add sections, each section can have a unique name.
 Number of Families
This is the number of family units (1 through 4 for the U.S. or 1 through 6 for Canada) in the residence. The number of families (along with the ZIP/postal code, year built, style and home size) is used in the cost calculations and to set the default material selections for the home.
Select the appropriate number of families from the drop-down list. The default is 1 family.
 Site Access
Select the type of access available to the home’s location from the following choices:
- Flat Area/Easy Access Roads: Site accessibility is easy for people, equipment, and materials to get to, in, and around the site. Accessibility for items such as a place for workers to park their vehicles, a level area for unloading and storing materials, and the ability of delivery trucks to get directly to the site is also relatively easy.
- Slightly Congested Road: Site accessibility may be slightly difficult for people, equipment, and materials to get to, in, and around the site. Accessibility for items such as a place for workers to park their vehicles may also be slightly difficult. There may be a slightly unlevel area for the unloading and storage of materials and delivery trucks may or may not be able to get directly up to the site.
- Narrow Roads/Hillside Area: Site accessibility may be slightly difficult for people, equipment, and materials to get to, in, and around the site. Accessibility for items such as a place for workers to park their vehicles may also be slightly difficult. Due to site slope, storage and unloading of materials requires accommodations not observed in level sites. Materials and delivery trucks may not be able to get directly to the site.
- Difficult Access/Steep Terrain: Site accessibility may be difficult for people, equipment, and materials to get to, in, and around the site. Accessibility for items such as a place for workers to park their vehicles may be difficult and delivery trucks may have difficulty getting to the site. In some cases, materials may need to be unloaded into smaller vehicles and delivered up to the site, then unloaded again. This condition is also found with mountain construction.
- Mountain Region: Accounts for the building costs in mountain resort areas where costs are high and site access is more challenging than standard conditions. These two factors combined comprise the mountain region conditions, which accounts for the labor rates and material costs reflecting the higher demand for labor and material in addition to added challenges involved in material delivery in these areas.
Note: If a mountain region home is built on a hillside, you should enter an appropriate hillside foundation percentage on the Building Information dialog, and enter a hillside slope using the drop-down list.
- Island Access/Short Distance (1 mile or less): Site accessibility is not possible for people, equipment, and materials without the use of boat, ferry or work barge (one mile or less). Islands not connected to a mainland by bridges, tunnels or roads are difficult to access and will increase the construction cost.
- Island Access/Long Distance (1 mile or more): Site accessibility is not possible for people, equipment, and materials without the use of boat, ferry or work barge (one mile or more). Islands not connected to a mainland by bridges, tunnels or roads are difficult to access and will increase the construction cost.
- Elevator Access: Site accessibility for condos, apartments, and co-op units is made through elevator access. To get people, equipment, and materials to, in, and around the site, elevators must be used. Delivery trucks must be unloaded and materials must be loaded and then unloaded from the elevator. The additional labor must be taken into account when dealing with elevator access.
- Isolated Rural Area: People, equipment, and materials are not locally available. Remote sites are difficult to access and will increase the construction cost.
 Year Built
Enter the year this section of the residence was built, using a full four-digit year between 1799 and the current year plus 1 (for example, if the current year is 2015, you can enter 2016).
Note: If the year built is before 1940, you must also select (Standard, Vintage, or Standard/Vintage combo).
 Roof Age
Roof age data is provided by RCT or may be user entered. The roof age is displayed in the Building Information pane on the valuation screen and on the Edit Building Information dialog. When a valuation is created RCT will provide the roof age and the roof age confidence score. This requires a complete address and the year built information.
You may manually enter the roof age on the Edit Building Information dialog. If the roof age is manually entered, the roof age confidence score does not display.
The roof age and confidence score may be updated by selecting Options > Refresh Roof Age on the valuation screen.
Roof age and roof age confidence score are displayed on the Standard and Detailed reports.
 Roof Age Confidence Score
Roof age lookups are address-specific lookups that return both a roof age and a roof age confidence score. The confidence score is a calculated score (low, medium, high, or modeled) used to indicate the confidence in the roof age that is being provided. Confidence levels are determined by the presence or absence of a roof permit or the greater of year built/permit coverage start date within a jurisdiction and the level of rigor of the jurisdiction that enforces roof permits.
The roof age confidence score is displayed on the Edit Building Information dialog.
The roof age and confidence score may be updated by selecting Options > Refresh Roof Age on the valuation screen.
Roof age and roof age confidence score are displayed on the Standard and Detailed reports.
 Overall Score
The Overall Score is a confidence interval score measuring levels of accuracy for the InterChange data for a given property record compared to a baseline set of data. The overall score is for the property record in its entirety. The confidence score is available for the main home only and only for U.S. addresses.
Administrators are able to set a threshold for the score. If the score is less than the defined threshold, an alert will be displayed on the RCT Alerts panel. The alert message will display "Verify with the home owner the pre-populated data in the valuation."
The score will indicate a confidence interval score of low, medium,or high.
 Total Living Area Score
The Total Living Area Score is a confidence interval score measuring levels of accuracy for the InterChange data for a given property record compared to a baseline set of data. The total living area score is for the total living area value of the property record. The confidence score is available for the main home only and only for U.S. addresses.
Administrators are able to set a threshold for the score. If the score is less than the defined threshold, an alert will be displayed on the RCT Alerts panel. The alert message will display "Verify with the home owner the pre-populated data in the valuation."
If a user changes the total living area on the Edit Building Information screen, the total living area score will no longer appear.
The score will indicate a confidence interval score of low, medium,or high.
 Year Built Score
The Year Built Score is a confidence interval score measuring levels of accuracy for the InterChange data for a given property record compared to a baseline set of data. The year built score is for the year built value in the property record. The confidence score is available for the main home only and only for U.S. addresses.
Administrators are able to set a threshold for the score. If the score is less than the defined threshold, an alert will be displayed on the RCT Alerts panel. The alert message will display "Verify with the home owner the pre-populated data in the valuation."
If a user changes the year built value in the Edit Building Information screen, the year built score will no longer appear.
The score will indicate a confidence interval score of low, medium,or high.
 Number of Stories Score
The Number of Stories Score is a confidence interval score measuring levels of accuracy for the InterChange data for a given property record compared to a baseline set of data. The number of stories score is for the number of stories value in the property record. The confidence score is available for the main home only and only for U.S. addresses.
Administrators are able to set a threshold for the score. If the score is less than the defined threshold, an alert will be displayed on the RCT Alerts panel. The alert message will display "Verify with the home owner the pre-populated data in the valuation."
If a user changes the number of stories on the Edit Building Information screen, the number of stories score will no longer be displayed.
The score will indicate a confidence interval score of low, medium,or high.
 Construction Type
To select the construction type for each section of the home, click the drop-down arrow and select the appropriate option from the following choices:
- Standard: This option calculates replacement cost using modern construction techniques and materials.
- Vintage: Available for homes built before 1940, this option calculates reproduction cost using the type of building options for homes built before 1940.
- Standard/Vintage: Available for homes built before 1940, this calculates the cost using modern (standard) construction techniques, but loads the appropriate pre-1940 or pre-1930 material selection assumptions. This choice is only available on systems with a custom configuration.
Characteristics for each of the construction types are listed below.
| Standard Construction Type: (Homes built from 1940 to present) |
|
Ceiling Height
|
8 feet
|
|
Wall Framing
|
2" x 4" standard wood
|
|
Roof Framing
|
Standard wood
|
|
Sheathing (walls and roof)
|
Plywood, 4' x 8'
|
|
Interior Walls and Ceiling
|
Sheetrock
|
|
Other features
|
Softwood interior stairs
|
| Vintage Construction Type: (Homes built in 1939 and earlier) |
|
Ceiling Height
|
10 feet
|
|
Wall Framing
|
Rough lumber
|
|
Roof Framing
|
Rough lumber
|
|
Sheathing (walls and roof)
|
Tongue and groove
|
|
Interior Walls and Ceiling
|
Wood lath, gypsum plaster, hardwood crown and base molding
|
|
Other features
|
Hardwood interior stairs
|
| Standard/Vintage Combination Construction Type: |
|
Ceiling Height
|
8 feet
|
|
Wall Framing
|
2" x 4" standard wood
|
|
Roof Framing
|
Standard wood
|
|
Sheathing (walls and roof)
|
Plywood, 4' x 8'
|
|
Interior Walls and Ceiling
|
Wood lath, gypsum plaster
|
|
Other features
|
Softwood interior stairs
|
The Standard/Vintage Combo construction type option in RCT combines the standard construction type engineering and structural framing specifications with the vintage interior finish material characteristics of the vintage construction type. For example:
- Standard construction type specifications would account for the structural framing, interior wall framing, floor and ceiling framing, exterior wall and roof framing, wall height and partition density.
- Vintage construction type specifications would include the partition wall materials, wall finish materials, ceiling material with finishes and floor finish materials.
Note: This option is not available in the Advanced Entry Method.
 Number of Stories
This is the total number of stories for the home.
Enter the number of floors above ground. You can change the number of stories for some styles, in which case the Number of Stories field is enabled. For other styles, the number of stories cannot be changed, so the field remains disabled.
Note: For styles such as bi-level, tri-level, split level and raised ranch, the number of stories will automatically be set during calculation.
If there is a fraction of a story, enter it as a decimal, not as a fraction (for a 1-1/2 story home enter 1.5, not 1 1/2). For a Cape Cod with an upper floor smaller than the first floor, enter 1.5 or 1.75, depending on the amount of finished area on the upper floor.
 Finished Living Area
Finished living area is the total finished floor area of the main home or section. Do not include any built-in garage area and any finished basement area, or bi-level unfinished lower level area. Finished living area is used to calculate the total living area. Finished living area is entered individually for the main home and for each section or wing that may be added.
Example 1:
If you have a 2,400 sq. ft. 2-story home with no built-in garage and no unfinished lower level area (home is not a Bi-level, Raised Ranch or Split-Foyer), you have 2,400 sq. ft. of finished living area.
2,400 sq. ft. total living area minus 0 sq. ft. built-in garage, minus 0 sq. ft. of lower level unfinished area equals 2,400 sq. ft. of finished living area.
Example 2:
If you have a 2,400 sq. ft. Bi-level home with a 400 sq. ft. built-in garage, you have 2,000 sq. ft. of finished living area.
2,400 sq. ft. total living area minus 400 sq. ft. built-in garage equals 2,000 sq. ft. of finished living area.
Example 3:
If you have a 2,400 sq. ft. Bi-level home with 420 sq. ft. unfinished lower level (35% unfinished lower level), you have 1,980 sq. ft. of finished living area.
1200 sq. ft per level, so 1,200 minus 420 sq. ft. of lower level unfinished equals 780 sq. ft. of lower level finished.
1,200 sq. ft. upper level total living area plus 780 sq. ft. of lower level total living area (finished), equals 1,980 sq. ft. of finished living area finished living area.
Example 4:
If you have a 2,400 sq. ft. Bi-level home with a 400 sq. ft. built-in garage and 400 sq. ft. of unfinished lower level (50% unfinished lower level), you have 1,600 sq. ft. of finished living area.
1200 sq. ft per level, so 1,200 minus 400 sq. ft. built-in garage = 800 sq. ft. of lower level. 800 sq. ft. of lower level times 50% unfinished lower level = 400 sq. ft. of lower level unfinished area and 400 sq. ft. of lower level finished area.
1,200 sq. ft. upper level total living area plus 400 sq. ft. of lower level total living area (finished), equals 1,600 sq. ft. of finished living area finished living area.
 Calculated Total Living Area
The calculated total living area is calculated by the system based on the Finished Living Area you entered. If you add a built-in garage the system will automatically adjust the Total Living Area appropriately.
 Wall Height
The vertical distance from the finished floor surface to the ceiling above it. This is also known as floor-to-ceiling height. Enter the percentage of the home (or section of the home if it has wings or is sectioned) that are between 7’ and 40’ high walls.
Note: Measuring from the top of a finished floor to the ceiling above it, will give you the wall height or floor-to-ceiling height. RCT automatically accounts for the joist area (joist height/dimensions) to set the story height or floor-to-floor height, which will get the exterior wall size and area correct.
First you must enter the percentage of the home that the wall height applies to, and then enter the actual wall height in feet between 7.0 and 40.0. The total percentages must equal 100%.
Example: If the home is a 2-story, 2000 square feet, and the first floor wall height or floor-to-ceiling height of the home is 10’ high and the second floor is 8’ high, the entries would be:

Example: In a 2000 square foot home, 500 square feet (25%) is a great room with a 16 foot ceiling (not a cathedral ceiling) and the remaining 1500 square feet (75%) has a 10 foot ceiling. In the Wall Height fields enter 25% for the 16 foot portion, and 75% for the 10 foot portion.

Note: The total of all wall height percentages should equal 100%.
 Perimeter
Use this option to enter the perimeter or select the shape of the home.
Using the option buttons, click a perimeter option then either select the applicable shape or enter a linear footage. The options are:
 Section Type (if Advanced Entry is selected)
In addition to being able to divide the home into the main home and one or more sections, you can also specify the section type (for example, whole house, vertical or horizontal, basement, garage, and so on). By using the horizontal section choices, you can identify whether or not a section includes the ground floor of the building (this means that the foundation, roof area, and perimeter can be calculated based upon the ground floor area of the specific section).
Example: For a 3 story house with a horizontal section for each floor, enter the following section types:
Main Home: Horizontal Ground Floor
Section 1 (Second Floor): Horizontal Upper Floor
Section 2 (Third Floor): Horizontal Upper Floor
Use the drop-down list to select the applicable section type option. Note: This option is only available in the Advanced Entry method.
 Coverage Type (if Advanced Entry is selected)
For individual sections, you can specify whether the cost for that section is part of coverage A or coverage B in the policy.
- Coverage A (dwelling) is the part of the dwelling policy that covers the dwelling and attached additions (for example, screened porches and breezeways, attached garage, etc.). Coverage A also covers the materials and supplies for the construction, alteration, or repair of the residence.
- Coverage B (other structures) is the part of the dwelling policy that covers unattached structures like private garage or a tool shed.
When applicable, use the drop-down list to select a coverage option.
For the main home this defaults to "Main Home" and is not editable. If you add sections, each section can have a unique name.
This is the number of family units (1 through 4 for the U.S. or 1 through 6 for Canada) in the residence. The number of families (along with the ZIP/postal code, year built, style and home size) is used in the cost calculations and to set the default material selections for the home.
Select the appropriate number of families from the drop-down list. The default is 1 family.
Select the type of access available to the home’s location from the following choices:
- Flat Area/Easy Access Roads: Site accessibility is easy for people, equipment, and materials to get to, in, and around the site. Accessibility for items such as a place for workers to park their vehicles, a level area for unloading and storing materials, and the ability of delivery trucks to get directly to the site is also relatively easy.
- Slightly Congested Road: Site accessibility may be slightly difficult for people, equipment, and materials to get to, in, and around the site. Accessibility for items such as a place for workers to park their vehicles may also be slightly difficult. There may be a slightly unlevel area for the unloading and storage of materials and delivery trucks may or may not be able to get directly up to the site.
- Narrow Roads/Hillside Area: Site accessibility may be slightly difficult for people, equipment, and materials to get to, in, and around the site. Accessibility for items such as a place for workers to park their vehicles may also be slightly difficult. Due to site slope, storage and unloading of materials requires accommodations not observed in level sites. Materials and delivery trucks may not be able to get directly to the site.
- Difficult Access/Steep Terrain: Site accessibility may be difficult for people, equipment, and materials to get to, in, and around the site. Accessibility for items such as a place for workers to park their vehicles may be difficult and delivery trucks may have difficulty getting to the site. In some cases, materials may need to be unloaded into smaller vehicles and delivered up to the site, then unloaded again. This condition is also found with mountain construction.
- Mountain Region: Accounts for the building costs in mountain resort areas where costs are high and site access is more challenging than standard conditions. These two factors combined comprise the mountain region conditions, which accounts for the labor rates and material costs reflecting the higher demand for labor and material in addition to added challenges involved in material delivery in these areas.
Note: If a mountain region home is built on a hillside, you should enter an appropriate hillside foundation percentage on the Building Information dialog, and enter a hillside slope using the drop-down list.
- Island Access/Short Distance (1 mile or less): Site accessibility for people, equipment, and materials to get to, in, and around the site is by ferryboat (one mile or less) or by limited roadways (no distance restrictions). The down time of the workers and delivery trucks must be taken into account when dealing with island construction.
- Island Access/Long Distance (1 mile or more): Site accessibility for people, equipment, and materials to get to, in, and around the site is by ferryboat only. The down time of the workers and delivery trucks must be taken into account when dealing with island construction.
- Elevator Access: Site accessibility for condos, apartments, and co-op units is made through elevator access. To get people, equipment, and materials to, in, and around the site, elevators must be used. Delivery trucks must be unloaded and materials must be loaded and then unloaded from the elevator. The additional labor must be taken into account when dealing with elevator access.
- Isolated Rural Area: People, equipment, and materials are not locally available. Remote sites are difficult to access and will increase the construction cost.
Interactive Help
Click a home style graphic to display a popup description. Click the name of a home style to go to a full page description of the home style.
Interactive Help
Enter the year this section of the residence was built, using a full four-digit year between 1799 and the current year (for example, 1964, not 64).
Note: If the year built is before 1930, you must also select Construction Type: Standard or Pre-1930 (or Std/Vintage Combo if configured). If the year built is between 1930 and 1940, you must also select Construction Type: Standard or Pre-1940 (or Std/Vintage Combo if configured).
To select the construction type for each section of the home, click the drop-down arrow and select the appropriate option from the following choices:
- Standard: This option calculates replacement cost using modern construction techniques and materials.
- Vintage: Available for homes built before 1940, this option calculates reproduction cost using the type of building options for homes built before 1940.
- Standard/Vintage: Available for homes built before 1940, this calculates the cost using modern (standard) construction techniques, but loads the appropriate pre-1940 or pre-1930 material selection assumptions. This choice is only available on systems with a custom configuration.
Note: This option is not available in the Advanced Entry Method.
Interactive Help
This is the total number of stories for the home.
Enter the number of floors above ground. You can change the number of stories for some styles, in which case the Number of Stories field is enabled. For other styles, the number of stories cannot be changed, so the field remains disabled.
Note: For styles such as bi-level, tri-level, split level and raised ranch, the number of stories will automatically be set during calculation.
If there is a fraction of a story, enter it as a decimal, not as a fraction (for a 1-1/2 story home enter 1.5, not 1 1/2). For a Cape Cod with an upper floor smaller than the first floor, enter 1.5 or 1.75, depending on the amount of finished area on the upper floor.
Finished living area is the total floor area (total living area) of a home (main and wings) less any built-in garage area and any bi-level unfinished lower level area. Finished living area is used to load the finish material selections for the home.
Example 1:
If you have a 2,400 sq. ft. 2-story home with no built-in garage and no unfinished lower level area (home is not a , Raised Ranch or Split-Foyer), you have 2,400 sq. ft. of finished living area.
2,400 sq. ft. total living area minus 0 sq. ft. built-in garage, minus 0 sq. ft. of lower level unfinished area equals 2,400 sq. ft. of finished living area.
Example 2:
If you have a 2,400 sq. ft. Bi-level home with a 400 sq. ft. built-in garage, you have 2,000 sq. ft. of finished living area.
2,400 sq. ft. total living area minus 400 sq. ft. built-in garage equals 2,000 sq. ft. of finished living area.
Example 3:
If you have a 2,400 sq. ft. bi-level home with 420 sq. ft. unfinished lower level (35% unfinished lower level), you have 1,980 sq. ft. of finished living area.
1200 sq. ft per level, so 1,200 minus 420 sq. ft. of lower level unfinished equals 780 sq. ft. of lower level finished.
1,200 sq. ft. upper level total living area plus 780 sq. ft. of lower level total living area (finished), equals 1,980 sq. ft. of finished living area finished living area.
Example 4:
If you have a 2,400 sq. ft. bi-level home with a 400 sq. ft. built-in garage and 400 sq. ft. of unfinished lower level (50% unfinished lower level), you have 1,600 sq. ft. of finished living area.
1200 sq. ft per level, so 1,200 minus 400 sq. ft. built-in garage = 800 sq. ft. of lower level. 800 sq. ft. of lower level times 50% unfinished lower level = 400 sq. ft. of lower level unfinished area and 400 sq. ft. of lower level finished area.
1,200 sq. ft. upper level total living area plus 400 sq. ft. of lower level total living area (finished), equals 1,600 sq. ft. of finished living area finished living area.
The total living area is the size of the main home plus each section/wing being entered (in square feet) based upon the exterior dimensions. When entering sections/wings, TLA should be entered individually for the main home as well as individually for each section/wing, not as a summarized value in the main home section.
Enter the square feet of the total living area.
Note: When calculating the total living area:
Include:
- Area for all floors
- Area for built-in garages
Do not include:
- Area for basements (which are included using the % Basement field)
- Area for porches, breezeways, or decks
- One-story attached garages (all of which are included in Attached Structures)
- Area for unfinished attic (which does not meet code for living area, and does not have adequate roof pitch/slope or ceiling height to qualify as a quarter, half or three-quarter story)
- Area for finished attic
Note: To enter the total living area for mobile-manufactured homes, use the actual dimensions (length x width of the box) not the dimensions from the hitch tip to the end of the unit. Avoid using the dimensions on the HUD label, because they are the nominal dimensions from the hitch tip to the end of the box. Using this as the total living area for the home could result in additional living area that does not exist, thereby causing overvaluation of the home.
This is the vertical distance from the top of a floor to the top of the next floor. This is also known as story height or floor-to-floor height. Enter the percentage of the home (or section of the home if it has wings) for each different wall height.
Note: Measuring from the top of the floor to the top of the next floor adds the joist area into the calculation, which will make the exterior wall size and area correct.
Enter a percentage between 0 and 100.
RCT automatically sets the wall height of the home (or each section if the home has wings) based on the year built. If you want to set the wall height yourself, enter the percentages in the Wall Height section.
Example: In a 2 story home, if the first floor is 10’ high and the second floor is 8’ high, the entries are:

Note: The total of all wall height percentages should equal 100%.
Use this option to enter the perimeter or select the shape of the home.
Using the option buttons, click a perimeter option then either select the applicable shape or enter a linear footage. The options are:
- Calculate Using Shape: Select this option if you want the system to automatically calculate the perimeter based upon the shape of the home or section, then select one of the following shapes.
- Measured Perimeter: Select this option if you want to enter the actual perimeter of the home (or the section) then type the ground floor perimeter (in linear feet) in the perimeter field.

Square | 
Rectangular | 
Slightly Irregular |

Irregular | 
Very Irregular | |
Interactive Help
In addition to being able to divide the home into the main home and one or more sections, you can also specify the section type (for example, whole house, vertical or horizontal, basement, garage, and so on). By using the horizontal section choices, you can identify whether or not a section includes the ground floor of the building (this means that the foundation, roof area, and perimeter can be calculated based upon the ground floor area of the specific section).
Example: For a 3 story house with a horizontal section for each floor, enter the following section types:
Main Home: Horizontal Ground Floor
Section 1 (Second Floor): Horizontal Upper Floor
Section 2 (Third Floor): Horizontal Upper Floor
Use the drop-down list to select the applicable section type option. Note: This option is only available in the Advanced Entry method.
For individual sections, you can specify whether the cost for that section is part of coverage A or coverage B in the policy.
- Coverage A (dwelling) is the part of the dwelling policy that covers the dwelling and attached additions (for example, screened porches and breezeways, attached garage, etc.). Coverage A also covers the materials and supplies for the construction, alteration, or repair of the residence.
- Coverage B (other structures) is the part of the dwelling policy that covers unattached structures like private garage or a tool shed. The coverage limit is 10% of coverage A.
When applicable, use the drop-down list to select a coverage option.
Home Styles
Add a Section
Delete a Section
Edit Policy Information
Add or Edit Materials
Reload Assumptions
Interactive Help
Help file last modified: 7/26/2018


